JA-80P
Service explanation for JA-80P
1 Installation
The installation of Oasis components is reserved only for installers certified by the distributor. The detector can be placed on a flat wall or in a corner of a room. Avoid objects that can rapidly change temperature, such as electronic heaters, gas installations, etc. placed in detection areas. Moving objects close to human temperature such as curtains placed above or behind a radiator should be avoided, as well as pets. Do not place detectors facing the lens in direct sunlight or spotlights, as well as avoid fans or drafty areas. Keep the detector away from metal objects, which can negatively influence the radio signal and communication.
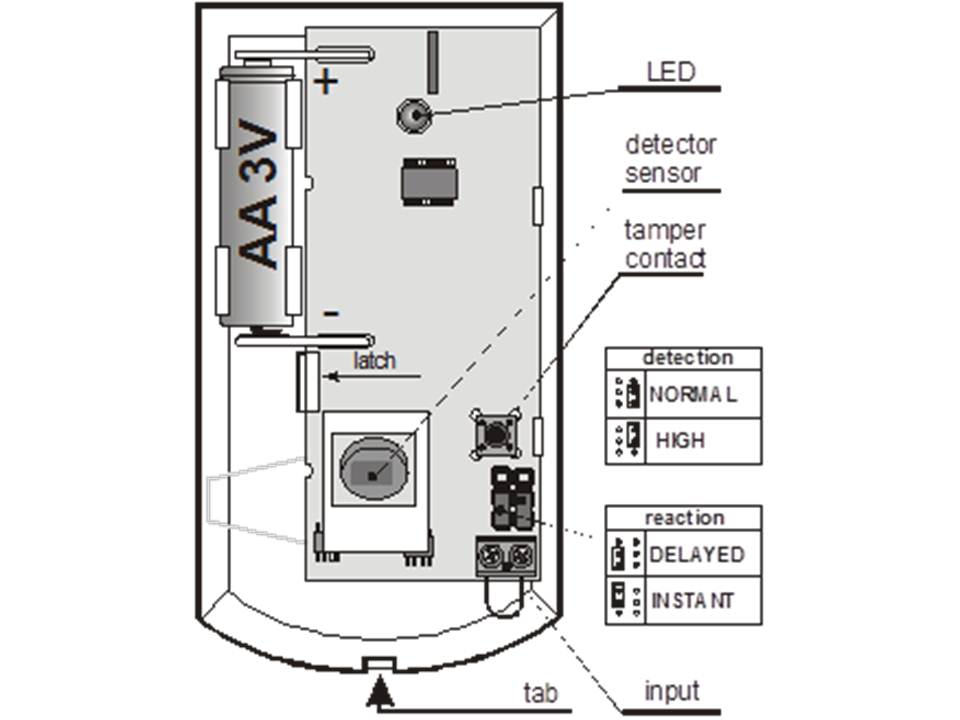
Open the detector housing by pressing tab. Avoid touching the electronics or damaging the antenna.
1.Remove the circuit board which is clamped with an internal tab. Push the screw holes through the artificial eye housing. At least one screw should be placed through the tamper sensitive section
2.Screw the bottom plate to the wall, about 2 meters above the floor ( vertically with the tab underneath) Place the circuit board back in its original place.
a. Do not connect the batteries yet and leave the housing open. Now follow the instructions of the control panel or receiver module. The basic reading procedure is as follows:
b. Enter read-in mode on the control panel by keying in the number 1 in service mode.
c. Insert and activate the batteries in the detector through which the detector will read itself into the system. Exit read-in mode by pressing "#".
To read-in a detector that has already been activated by a battery; deactivate the detector's batteries, and press the tamper switch to discharge the circuit board. After discharging, the detector is ready to be read again after 1 minute. After the batteries are reactivated, the detector LED will remain lit for 1 minute.
2 DIP switches
NORM / HIGH: select the sensitivity of false alarms. The NORM position combines a very good immunity time with a fast sensor response. The HIGH positive gives a lower sensitivity to false alarms combined with a slower sensor response time, this setting is used for problematic installations
Warning: Most false alarms are caused by poor positioning / projection of the detector.
INS / DEL: DEL gives an IN / OUT loop delay at the entrance of objects. INS gives the detector an instant alarm activation when the system is armed. This DIP switch (INS/DEL) gives a natural response only if the detector, as an Oasis alarm detector is read in. It also gives none if the detector is read in on a UC-8x or AC-8x receiver.
3 Testing the detector
15 minutes after the detector is locked with its housing, the detector LED gives a light signal and a notification to the control panel each time it is activated by motion.The notification to the control panel is audible in service mode. The strength of the signal can be read on the code control panel.
4 5 minutes/1 minute battery saving mode
To conserve battery power, the detector will shut down after closing the housing after 15 minutes go into battery saving mode. The detector will remain alert to detect after these 15 minutes. After the first motion detection it will be reported to the control panel, and for the next 5 minutes the detector will ignore any motion. After these 5 minutes, the detector will automatically start detecting again and will immediately report to the control panel when detected. The time of the power saving mode can be shortened to 1 minute by pressing and holding the tamper switch when activating the batteries. Not pressing this tamper switch gives 5 minutes of power save time.
5 Replacing the batteries
The detector informs itself about the status of the battery voltage. If the battery voltage is too low, a message will be given to the control panel to notify a user or installer. During low battery voltage, the detector will light its LED with every movement. The batteries must have been replaced in service mode by a certified technician within two weeks when a "low battery voltage" notification is given.
After the batteries are replaced, the detector takes 60 sec to stabilize. After the batteries are replaced, the detector's LED will light up on motion to test the detector. Take batteries to the appropriate regular landfills and do not throw them in the trash.
6 Removing the detector from the system
When a detector is removed from the system, it will be noticed by the system, and ere and notification will be made to the owner and or alarm center. Before removing a detector from the system, it must be unprogrammed.
7 Detection Characteristics
The standard lens has a detection range of 120° over a distance of twelve meters. The protected area is detected by three layers (beams) as shown in the figure below.
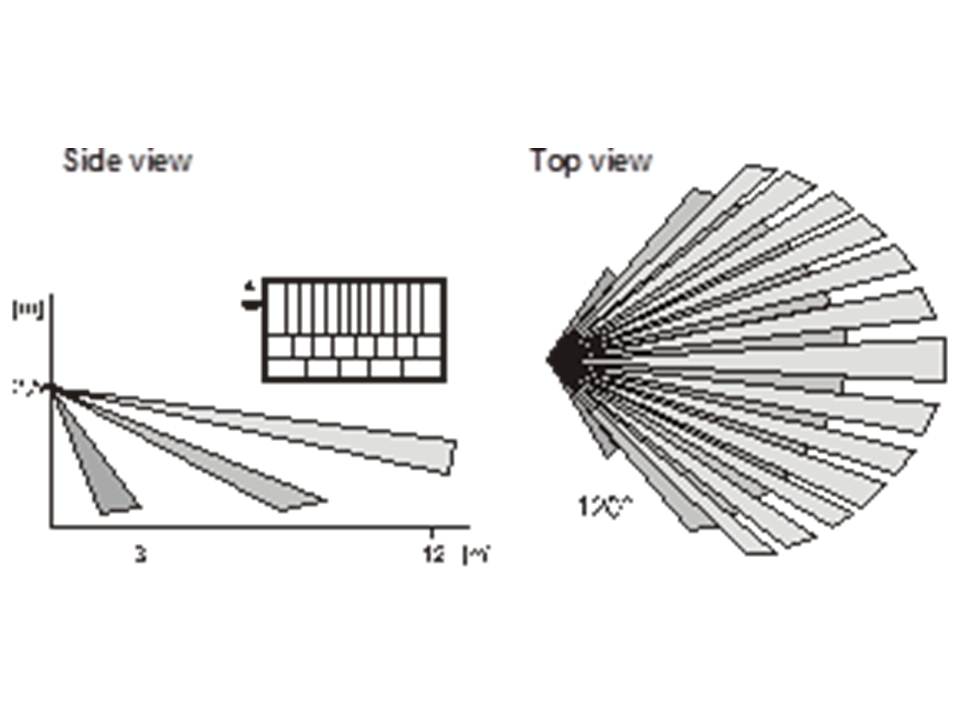
The characteristics can be changed with optional lenses.
| JS-7904 | Usable in long corridors, the center beam reaches 20 meters |
JS-7906 | Upper beam only with a range of 120° and a range of two and a half meters. It ignores the floor so small pets can move across it. |
| JS-7901 | Has a vertical range, zadat will be perceived as a curtain and detection occurs when moving through this curtain. |
Note: Nada toe lens is replaced, please test this lens skillfully, if not installed correctly, this lens will not meet the expectation.
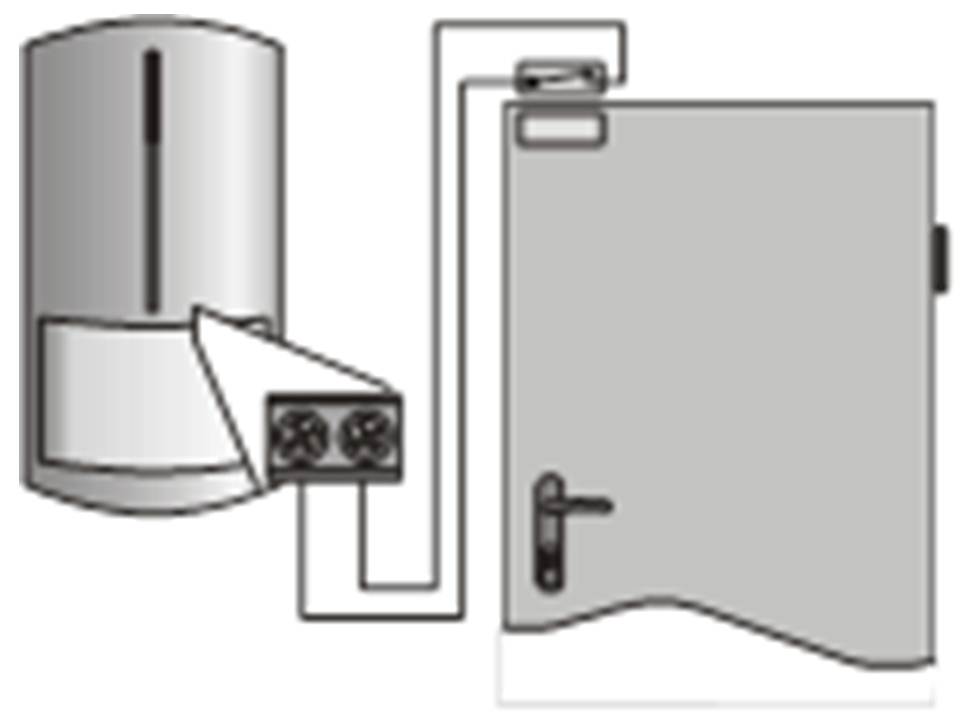
8 Auxiliary alarm input
There is an input contact in the detector which , which interconnects other items such as opening of a door or window detect.Opening of a door has the same effect as detecting movement. The maximum length of cabling is 3 mtr.bridge this input when not in use.