
JA-180P
Service explanation for JA-180P
Wireless PIR
This product is part of the Jablotron 100 series alarm system. It serves for spatial detection of movement of persons within buildings. Its detection characteristic can be changed by using an alternative lens. False alarm immunity is optional on two levels. The detector communicates via the wireless Jablotron protocol and is battery powered. 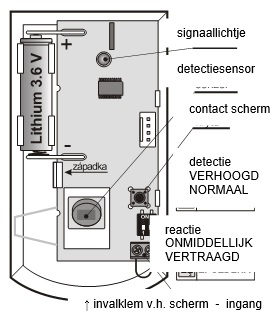
Installation
The detector must be installed by a trained technician with a valid Jablotron certificate. The detector can be installed on a wall or in a corner of the room. Its field of view must be clear of objects that change temperature quickly (electric heaters, gas appliances, etc.), no objects with a temperature approaching human body temperature and that move (e.g. billowing curtains above a radiator) and no pets. It is not recommended to install the detector opposite windows or reflectors, not even in places where the air flows (ventilation, drafts, non-closing doors, etc.).
In front of the detector there must be no obstacles that obstruct its view and it must not be installed near metal objects (which obscure radio communication)
1. Open the detector's screen (by pressing the snap clip) - do not touch the PIR sensor inside or damage the antenna above the signal light
2. Remove the electronics panel - it is held inside by a snap clip
3. Push through the holes for screws in the plastic back panel (at least one screw must be in the assembly tear-off detection segment)
4. Screw the plastic rear wall, about 2.5 m above the floor (vertically, with the retractable clamp of the screen down)
5. Put the electronics back (with the sensor to the drop-in clamp of the screen)
6. Leave the battery disconnected and the screen open. Proceed according to the installation manual of the control panel (receiver). Basic Steps:
a. Switch the control panel to service and activate learning mode with key 1
b. Plug the battery into the detector - that's how it learns
c. End the learning mode with the # key
To comply with the CSN-EN 50131-2-2 standard, the drop-in clamp of the screen must be locked by the supplied screw.
If you are learning the detector in the receiver after the battery was already connected, first disconnect it, then press and release the screen contact several times (the residual energy will be used up) and only then execute the learning mode.
After connecting the battery, the detector needs about 2 minutes to stabilize. The light stays on for the time being.
Setting switches
Switch 1: determines the degree of immunity against false alarms. Position OFF combines good immunity with fast response. Position ON increases sensor immunity at the expense of speed (to be used in problematic installations).
Note: The most common cause of unwanted activation is incorrect detector placement.
Switch 2: DEL / INS determines whether the detector is on the entrance way to the house and grants an exit and entry delay = position OFF. In the ON position, the detector triggers an immediate response from the armed control panel. The switch is only meaningful when used with the Jablotron control panel with NATUR response set. If a different reaction has been set in the detector's control panel, or you are using the detector with a JA-182N or JA-180N receiver, the jumper has no meaning.
When the screen is opened, the detector always responds with a tamper signal.
Detector testing
For 15 minutes after closing the screen, the detector indicates activation by means of the signal light. The control panel can check the detector signal in service mode, including measuring its quality.
Choose sleep time of the sensor
5 minutes / 1 minute
To save battery life, the detector goes into power saving mode 15 minutes after closing the screen. If motion is detected, it informs the control panel and does not respond to motion for the next 5 minutes (sensor sleeps). At the end of this period, the sensor wakes up and goes on continuous watch until the next movement in the room, etc.
The sleep time of the sensor can be shortened to 1 minute by pressing and holding the ignition switch of the display when connecting the battery (if you connect the battery without pressing the ignition switch, the sleep time will be set to 5 minutes).
Replace battery in detector
The product checks the state of the battery and informs the user (possibly also the service) as soon as it starts to run out. The detector continues to operate and also indicates movement with a short flash of the signal light. We recommend replacing the battery within 2 weeks. The battery is replaced by the technician in service mode. After replacing the battery, the sensor needs approx. 60s to stabilize - the signal light remains on. After the light goes out, test the operation of the detector.
If a weak battery is inserted in the detector, its signal light will flash for approx. 1 minute. After that, the detector will work, but will report a low battery
Do not dispose of a used battery with household waste, but dispose of it with chemical waste.
Remove detector from system
The system reports any loss of the detector. If you intentionally disassemble the detector, you must also delete it in the control panel.
Detection characteristic
The detector is supplied with a 120°/12m lens from the factory. The room is covered by 3 fans (curtain fields) – see the following picture. 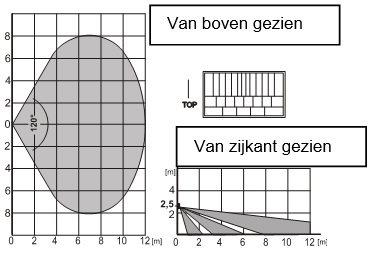
Characteristic can be changed by using an alternative lens:
JS-7904 is intended for long corridors, the middle curtain field reaches up to 20m
JS-7906 only has the top curtain field of 120°/12m and does not cover the floor (can eliminate the movement of small animals across the floor)
JS-7901 creates a vertical curtain - does not cover the surface, but creates a detection wall (a barrier can be defined, where any violation is reported)
Note: After replacing the lens, check that the detector covers the room properly (an incorrectly installed lens may cause a detection error).
Auxiliary input for wires
This input can be used, for example, for a magnetic door/window detector. Activation (opening of the terminals) has the same effect as the movement for the detector.
The cable connected to the terminals must be max. 3m long, it is recommended to use a shielded cable. If the input is not used, the terminals must be connected. 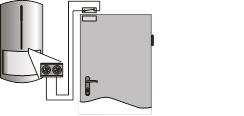
Technical parameters
Power supply Lithium battery type LS(T)14500 (3.6V AA / 2.4Ah)
Typical battery life approx. 3 years (sensor sleeps 5 min.)
Communication band 868.1 MHz, Jablotron protocol
Communication range approx. 300m (direct visibility)
Recommended installation height 2.5 m above the floor
Detection angle / recording length 120° / 12 m (with base lens)
Environment according to EN 50131-1 II. inside, general
Operating temperature range -10 to +40 °C
Dimensions, weight 110 x 60 x 55mm, 100g
Classification according to EN 50131-1, EN 50131-2-2,
CSN EN 50131-5-3 grade 2
Further complies with ETSI EN 300220, CSN EN 50130-4,
EN 55022, EN 60950-1
The detector is designed and manufactured in accordance with the applicable provisions: Government Decree No. 426/2000 Coll., in the text of regulations promulgated later, provided that it is used according to its intended purpose.
Note: Although this product does not contain any harmful materials, do not dispose of it with household waste, but hand it in at the collection point designated for electronic waste.

